Showing posts with label DIY. Show all posts

Friday, October 20, 2023

Time for Some Change - Halloween Pillow Update

I made these pillows many years ago with a craft group that I ran at the time. 

I get complements on them every year. 
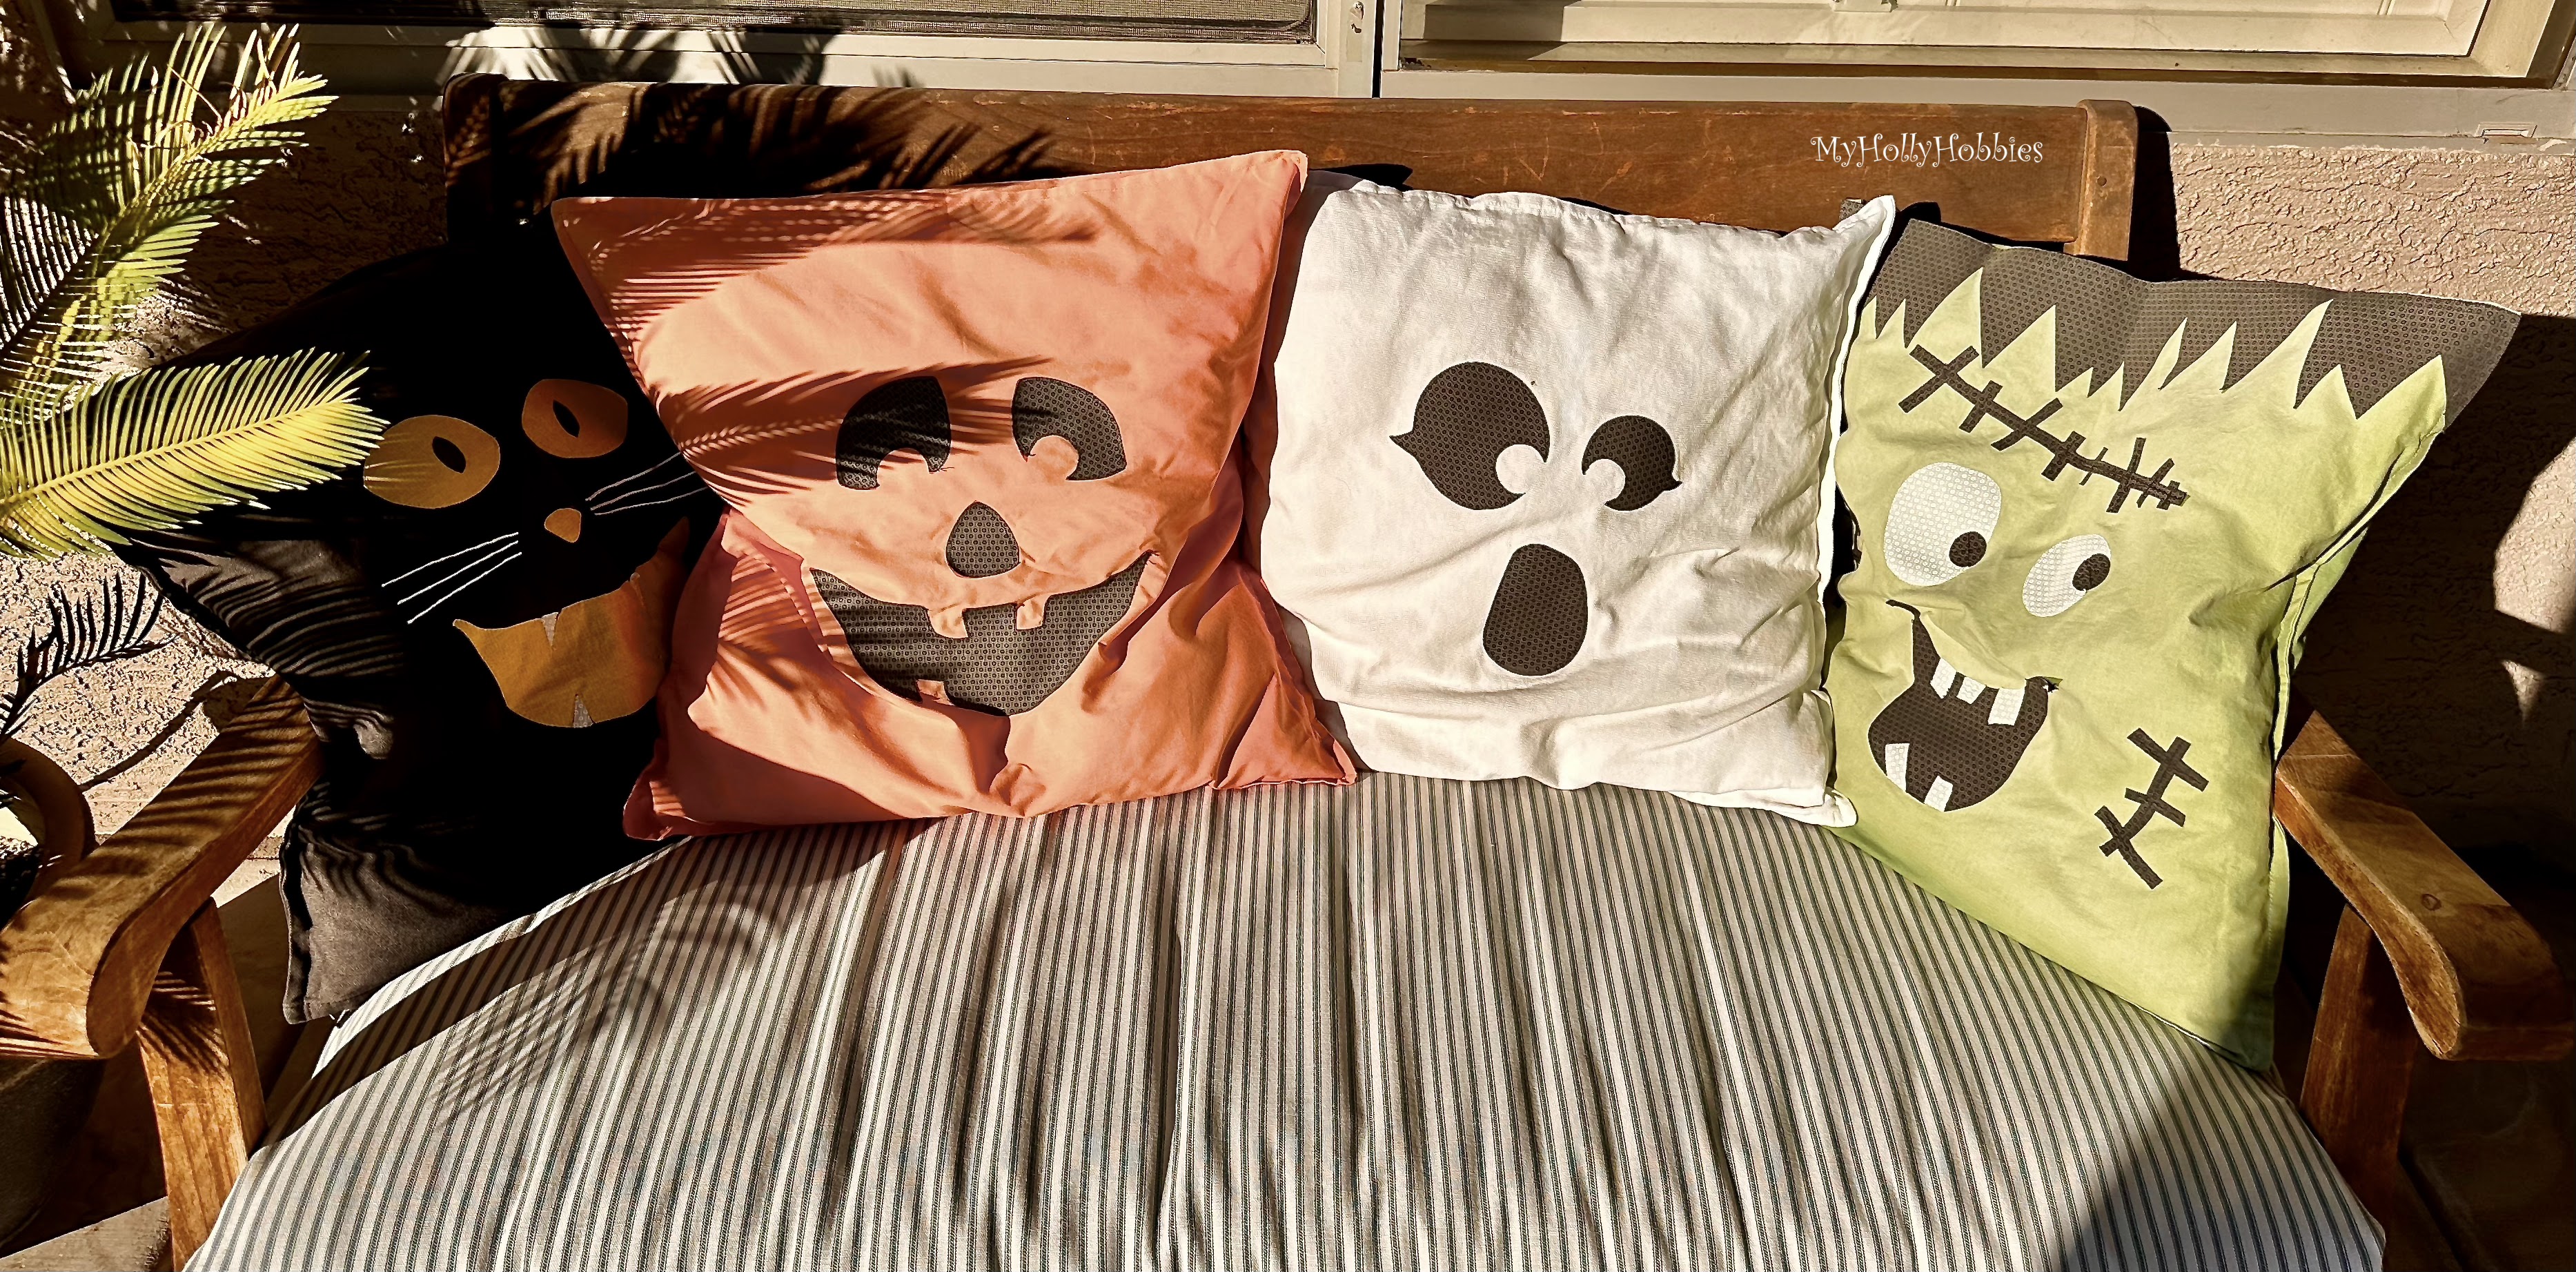

I got the inspiration from here. We used Gurli pillow covers from Ikea for the ghost and black cat.  They didn't have the colors needed for the jack-o-lantern or the Frankenstein, so I made those myself.  I made simple pocket pillow covers from cotton broadcloth.  I used small designed quilting fabrics to make the faces on each pillow. I used my Cricut to cut everything, some lightweight interfacing to attach them and then a basic stitch on the sewing machine around the edges to keep it all in place You can see it in the close up.

Unfortunately the Arizona sun is very hard on any fabric. As a result, they have faded a lot. 

So I thought I would update them this year.  My kids all like the Nightmare Before Christmas movie, so I created new ones based on the 3 main characters. 


I again used the Gurli pillow cover from Ikea.  This time they had green - huge time saver! Instead of using quilting fabric for the faces, I used a puff vinyl. It was extremely easy to use and I like the textured look it created. I used my Cricut to cut the vinyl. 


I'm not sure how the vinyl will hold up to the Arizona sun, but I thought I would give it a try.  Worse case scenario, I replace the vinyl with fabric in a few years.  I will keep you updated.

I LOVE how they turned out!  Hope you do too!

Happy Crafting!


Monday, December 24, 2012

Grandparent Gift

I have been trying to figure out something for my mom for Christmas. All she says she wants is family pictures, which is a great and easy gift. But since all 4 of my siblings and their families are going to be at my parents for Christmas - the first time in over 8 years - we are having family pictures taken. So I wanted to do something different. I searched Pinterest and nothing caught my eye. So I googled "DIY grandparent gift ideas". I came across this blog that had a bunch of ideas.  But this one jumped out at me: 

I loved the idea, but knew that waiting until the last minute like I have, I wouldn't be able to order it, plus I know that I could create something similar. So here is mine:
I used Photoshop Elements 8 to create it. I have tons of digital scrapbook files, so I selected a background and started playing. I'm not very proficient with Photoshop Elements, so it did take me some time to play around and make things work. I am so excited with how it turned out. I sent it to Costco to print and put it in a 12x12 frame I picked up from JoAnn's Etc. 

I can't wait for her to open it on Christmas!

Happy Creating!
Holly

Monday, December 17, 2012

Neighbor Gifts: DIY Candles

I made 3 candles HERE for November craft group. My husband liked them enough that he wanted me to make more - 9 more to be exact.  The difference from from putting together the craft in October to making them in December is amazing. Plus the fact that I needed to make 9 of them. I didn't care to use the hot spoon variation, so I bought a heat gun (used in embossing) at Hobby Lobby-of course using a 40% off coupon. If you use a heat gun, just be sure you move it around a lot or it will cause the wax to come through the tissue paper and run down the sides.

 The candles I originally used were unscented from Hobby Lobby-because their Christmas stuff wasn't out yet. I found Winter Wonderland scented ones at Walmart. They were a tad bit more than those from HL because I wasn't able to use a 40% off coupon. But I wanted scented ones as gifts. I also found more options for the tissue paper. I added a few Hershey Kisses, changed out the sisal with tulle-because I had some on hand and I personalized the tag using my Cricut.

Thursday, December 13, 2012

Craft Group: Christmas Table Topper

So the Halloween Placemats were such a hit, that I decided to try the same technique and make table toppers for various holidays. I had some left over red burlap that I cut into 2 squares (they are about 22 inch squares). Using my Cricut, I cut vinyl stencils for each of the corners. After applying the vinyl to the burlap, I used newspaper and painters tape to cover the rest of the fabric. 
Here is the final results of one I made for Valentines Day and one for Fourth of July:
(sorry I was too lazy to actually iron them before I took the pictures)

If you look close at the stars, you will see crooked edges and the white doesn't look filled in. I had tried using acrylic paints with a fabric medium mixed in. It took I don't know how many coast and it still looks a bit pink. So when I did the hearts and the blue stars, I switched to using spray paint. Worked much better, but it still took a quite a few coats (just not as many as the acrylic paint). 

So when it came time to get things ready for December's Craft Group, I thought I would try using Duck Canvas instead of the burlap. I sewed a decorative stitch on the edge, like I had done with the placemats. And this time I wanted to try using freezer paper to make the stencils. If it worked, it would be a lot less expensive then the vinyl. So using my Cricut, I cut the designs in the freezer paper. Then ironed the freezer paper - shiny side down on the fabric. Then spray painted.
And the final product was a fail!  The freezer paper didn't adhere to the canvas so well, so there was over-spray as well as edges to the designs that just didn't look good.  It won't be a give like I hoped, but I was able to  "save" it to use on my kitchen table by using a black Sharpie and outlining it.
Fail #1:


So since that failed, I checked out other options on Pinterest. I came across one that used contact paper from the dollar store. Well that was a fail as well, but nothing could "save" this one. The contact paper didn't adhere well either, plus once you got spray paint on it, the edges would curl up, which only allowed for one coat of paint. Even one heavy coat of paint didn't work.
Fail #2:

What did work?
Using the stencils created from the contact paper and we painted them with acrylic paint. It took 3-4 coats and a little bit of touch up once the contact paper was removed.

But I did fail again
 by not getting a picture of the final product.
I need to make more for gifts, so when I do, I will add a picture.

Happy Crafting!
Holly


Saturday, December 1, 2012

Craft Group: Christmas Candles

In my planning for our November craft, I was thinking a head for Christmas and was trying to come up with something that was inexpensive that you could give as neighbor gifts, teacher gifts or that would work in with holiday decor.  I came across Stylizmo's Christmas Candle, and thought it would be perfect.  I hunted for the just right napkin, but ran into the fact that - unlike now - not very many places had Christmas napkins or tissue paper out at the end of October.  So I ended up using an everyday foil tissue I found at the Dollar Tree and digging into my supply of Christmas tissue paper (the Christmas colored stripe and the snowflakes).  
This is what I came up with:

I got the candles at Hobby Lobby in a 2 pack (except the one with snowflakes-it's an old candle I've had for years), I used my Cricut machine to cut out the tags and used a stamp from Stampin' Up that I already had. You could use stickers or if your penmanship is better then mine, then you could always write it. 

A couple days ago, my hubby gave me a list of more I need to make. 
I better get a meltin'.

Happy Crafting!
Holly

Monday, September 10, 2012

Craft Group: Halloween Placemats

A quick apology for my lack of posts. The summer was a CRAZY, CRAZY summer. I'm back and hopefully won't be AWOL like that again.

As I have shared with you before, a friend and I host a monthly craft group. 
So our craft for September is Halloween Placemats.

 I bought painters drop cloth canvas (8oz).  I cut the 14"x18" rectangles using a rotary blade and cutting mat. Being lazy - I didn't feel like doing rolled hems - I used a decorative stitch about 1/4" in from the edge, then frayed the edges.  I think it adds to the look of the placemats.


Using my Cricut, I cut vinyl to use as stencils. I then stuck the reversed image of the vinyl on to the canvas. (The part I didn't want painted). Using painters tape and newspaper, I covered all the edges that were not covered by the vinyl. Then using Rustoleum black spray paint, I painted the canvas. 

Here are the designs that I used for mine:
You could add others ideas like witches and bats, Trick-or-Treat, etc... 


NOTE: My placemats have been washed twice so they do have a little weathered look.
Also, during Craft Group we had a couple of cans of Krylon paint.  Those that used the Krylon had a little bit darker black design-it didn't seep into the canvas as much as the Rustoleum. I do not know how those will wash up-I'm assuming similar to mine.

Happy Crafting!
Holly

Monday, May 14, 2012

Up a Tree with Cats!

As I shared previously, we have a new little kitten in our home and 2 more joining us shortly.  Knowing how much they like to claw at things, the fact that we don't feel that it is right to declaw cats and how much we don't want to replace our furniture any time soon  (well my husband doesn't), we decided that we would get the kitties a cat condo/tree (what ever you want to call it). After looking and deciding that we didn't want to fork out $150 for one at the pet store, I started searching on the internet for ideas to build my own.  In my searches, I came across plans on https://dadand.com/diy-cat-tower/ He was able to build it for $25. That was all the motivation that I needed. I didn't have the scrap wood laying around that he had, so it did cost me a little more. Plus I modified the plan just a little which did add a little more cost. It cost me about $40.00. It was fairly easy to make as a beginner. I did have a second set of hands, thank you again Hubby, which did make things go a little easier. Plus I borrowed a Kreg jig from a friend.

My supply list:
1 - 2' x 4' x 1/2" board of MDF
1 - 2" x 4" x 8' 
2 - 50ft of 3/8" sisal rope
2 1/2 ft by 12 ft of remnant carpet
18 - 2" wood screws
6 - 1" wood screws


If you check out the plans and directions, you will notice one change just by looking at it. I wrapped the shortest and the next shortest posts in the sisal rope. I used 3/8". This meant that I needed two bundles of 50ft rope. We considered wrapping all three in the rope, but decided that we didn't want that additional cost. I didn't like the idea of the staples on the rope. I was concerned that it may injure one of the cats if their claw got caught on one of the staples. So in my original searches, I remembered reading how someone had started the rope by using a screw to hold it on to the post, then wrapped the post as tight as they could with the rope, plus they used a hammer to tap the rope closer together to make it tighter. They then ended the rope with the 1" screw as well.  So that is what I did. If I could find the website again, I would give full credit to them, but I just don't remember it and didn't "pin" or bookmark it. Sorry!


I followed dadand.com's directions for cutting the corners of the carpet. Most of my corners met up correctly, but I evidently goofed up the cut on some, because the points didn't come together as nicely so there are gaps.  I don't know if I would use that cutting guide again. I don't care for the corners being "open" (see picture below). When I make the next one, I will research other ways to finish the corners. Plus I may add another tier around 36" so there isn't a big jump from the 24" to the 48".  Just thinking of the little kittens that can't make the huge jump yet.


Mickey took to it immediately and started scratching on it. He likes it enough that he has slept on it quite a bit as well. Hopefully the other two will like it as much.

Holly


Monday, April 30, 2012

Our Growing Family

A friend and I put together crafts for a craft group that meets once a month.  The craft that we have put together for May is a growth chart. There are many out there in the blogland. We compiled what we liked of each and created this:

We bought a 1"x8"x6' board. I bought Oops paint at Home Depot. Oops paint is paint that has been mixed, but was the wrong color, so it is way cheap. You may have to ask the guys at the counter if they have any. Each store handles it differently. Some have it out so you can see it other stores keep it under a counter and have to open the cupboard for you. The quart I bought was only $2.00. It was the eggshell finish that I like. Plus the color is close enough to the color of my walls, that it will blend in, which is what I wanted. 
I have all girls, so the flowers work for my family. I cut all the lettering, the hash marks as well as the first layer of the flower out of vinyl using my Cricut. 
  
I then cut the 2nd and 3rd layer of the flowers out of scrapbook paper. I used 3 different, coordinating papers and layered them. I used gem brads that I already had. I wish the centers were a little bit bigger, but I didn't want to go buy bigger gems.

It looks good without the flowers too if you have boys or don't care for the flowers:
 

I hope it measures up and inspires you to be creative!

Holly


Monday, April 23, 2012

The Tour Continues...

Since I showed you two of my daughter's rooms, I thought I would give you a tour of my home, starting with the master bedroom.

When we moved into the house over 8 years ago, we painted the walls Macadamia by Sherwin Williams. My bedding was from Ikea. It was a deep red that had color-on-color embroidery across the top. As I shared previously, I have grown tired of the darker colors in my home. So the change truly started with the master bedroom.

First, we up-sized our bed to a California King. This means I HAVE to redo the entire room, right?!?! My hubby knows me too well and knew this would happen, so when he got the bed, he also gave me a gift card so that I can buy all new bedding.

I pulled the main color of the duvet for the walls. So now the walls art Celtic Gray by Behr and the ceiling is Delicate Mist also by Behr. I went with one shade lighter on the ceiling to help make the ceilings feel higher.

We added crown molding. Then I painted all our furniture, which is from Ikea, the same brown from the duvet.  I don't have the color name - sorry!

I also "built" my headboard. I used three 28" primed hollow-core doors. I painted them the same dark chocolate brown of  the furniture.   They are just leaning up against the wall and the bed holds them in place.

I found the prints at Ikea. I couldn't find canvases sized to fit the prints. So I made my own. I used 1x2's and stretched muslin fabric across. I then Mod Podged the prints on to my canvases. I attached ribbons to the back and hung them on adhesive hooks.


The opposite wall is all windows. We have black-out honeycomb blinds. I want to add long curtain panels, but it is been low on my priority list, so I haven't done anything about it yet.

A few weeks ago, I found some awesome lamps at a garage sale. I've spray painted them and once I find the right lamp shades, I will show you the finished project.  Their new home will be here in the bedroom.

I hope you have been inspired!

Holly

Monday, April 16, 2012

DIY Signs

When my kitchen had an empty space, I decided that I wanted to create a sign. My hubby brought home a couple of old pallets from work. One was really beat up, which was perfect!  It had the wear and tear on the wood to give my sign that aged look that I wanted.

First I tore the pallet apart. Then I cut the wood down to the length I needed for my sign. Since I wanted the sign to look like it was an actual sign from an old coastal resort, I made it quite large. Then my little helper sanded it just a little so that we wouldn't get splinters. 

I used my Cricut to create stencils. I traced them on the wood to figure out the placement and how large of an area I needed to paint for the background. Taped it off and painted it Antique White. Because I was looking for the aged look, I wasn't worried about covering the wood. I let the wood grain show through.

Then stencil the letters. Once I had all the letters stenciled, I free handed shadows and highlights to each of the letters to give them dimension. Then I used tracing paper to trace the nautical compass in the middle. Using the tracing, I painted the compass. Once all the paint was dry, I lightly sanded.

Finished product

In it's new home.
As you can see, we have lights on top of our cabinets. After putting them up there around the nutcrackers at Christmas, we decided we really like it being lit up, so we left them.

I hope you like and that it inspires you to go create!
Thanks,
Holly


Sunday, April 8, 2012

Off To The Coast...

I WISH!!!

Instead, I am attempting to bring the coast to Arizona.  I love beachy/nautical items. In an attempt to "lighten up" my kitchen, I have decided to bring in a beach cottage feel. My husband and I were on a trip to Cabo San Lucas a few years ago and I fell in love with the Mexican pottery. I bought a platter with the plans to redo my kitchen in yellow with the blue from the pottery as an accent color. Once I actually got started, I decided I didn't necessarily want to change my wall color. It is Honeydew SW6428 by Sherwin Williams. So I decided to stick with blues, aquas, turquoises and light greens-colors from the ocean.

Most of the stuff I have had collecting dust in a closet or in other parts of the house. Eventually it will be a entire kitchen makeover, but it has to be done little by little - due to the money lack of money issue. 

Here I spray painted a vase with Rust-Oleum satin Aqua and added greenery that I was already using in the kitchen. The blue bottle was pulled out of box in the closet. You can kind of see in the picture, that it has imprints of seashells. The art is by an artist from California, Sally Huss. I really like her work and have a few  of her prints. This particular one is of the San Diego coast line. 

 The lantern is from Ikea-it was originally black. I had purchased two of them for my patio table, but decided I needed a lantern in the kitchen. So I spray painted both of them white. (The other, I use on my ledge with holiday decor.) The plate is from Pier 1. The nautilus shell I have had for many years. The white pillar I bought last year at an antique store in Seattle as well as the blue vase. The white candle holder is from Big Lots about five years ago.

The bottles are from garage sales or were given to me by my sister. The charger and plate are both from Pier 1. The basket in this picture and the next were from Goodwill last year. 

The little lantern is another from Ikea. I found the green vase at TJMaxx. It already had the jute and shell on it.  The shells inside I have had for many years.  This is the platter that inspired the transformation. 

I then decided that I wanted a sign. I liked ones that are geared towards the kitchen, like EAT. But I didn't feel that it would flow with the beach feel. So I was inspired by this one

I liked the weathered look of it, like it came off an old resort. So I made my own.  
(Details of how I did it to follow.)


I hope you are inspired by what you see.

Holly